Pyspark - How to preprocess Large Scale Data with Python
논문 정보
- Date: 2024-07-23
- Reviewer: 준원 장
- Property: spark
0. Prerequisites For Practice
-
Spark runs on Java 8, 11, or 17.
- https://www.oracle.com/java/technologies/downloads/#jdk17-mac
-
Install Apache Spark (Framework that powered the pyspark)
-
https://spark.apache.org/downloads.html
-
Latest Version의 Pre-built for Apache Hadoop 3.3 and later download
-
-
Spark runs on Python 3.7+
-
Install the following libraries in Python
pip install pyspark findspark
conda install jupyter
- Launch jupyter lab in python
jupyter - lab;
1. Introduction to Spark
Spark
-
대규모 데이터 처리를 위한 분석 엔진 (unified analytics engine for large-scale data processing)
-
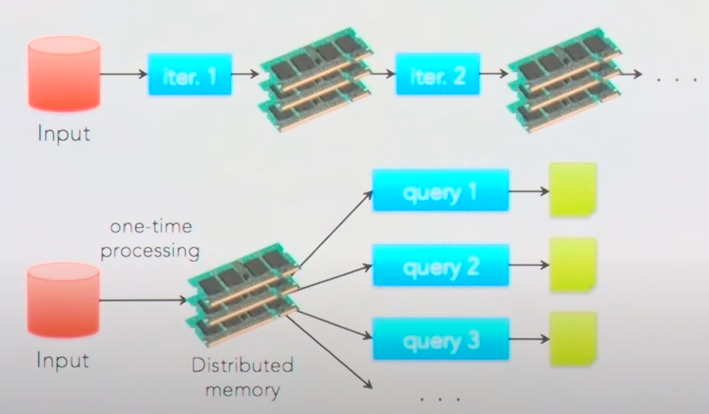
In-Memory (RAM) (Hadoop은 Disk에서 처리되기 때문에 여기서 속도차이가 발생)
-
분산 병렬처리
-
사용하기 쉬움
- Write applications quickly in Java, Scala, Python, R,and SQL.
MapReduce란?
-
Spark를 알기 위해서는 MapReduce라는거에 대해서 알면 매우 좋다
-
MapReduce는 대규모 데이터 세트를 처리하기 위한 프로그래밍 모델이자 구현 (i.e., distributed data processing)
-
이름에도 명시되어 있듯이, 해당 모델은 두 가지 주요 단계, 즉
Map단계와Reduce단계로 구성- Map:
- 입력 데이터를 키-값 쌍으로 변환하고, 각 데이터 조각에 지정된 Map 함수를 적용
(예시)
  - 각 단어를 `(단어, 1)`의 키-값 쌍으로 변환

  - "hello world hello"라는 텍스트가 있다면, 이는 `[(hello, 1), (world, 1), (hello, 1)]`으로 변환
-
Reduce:
- 맵 단계에서 생성된 키-값 쌍을 키에 따라 그룹화 → 그룹화된 각 키에 대해 리듀스 함수를 적용하여 최종 결과를 생성
(예시)
- `[(hello, 1), (hello, 1)]` 및 `[(world, 1)]`로 그룹화 → `hello`는 2번, `world`는 1번 출현
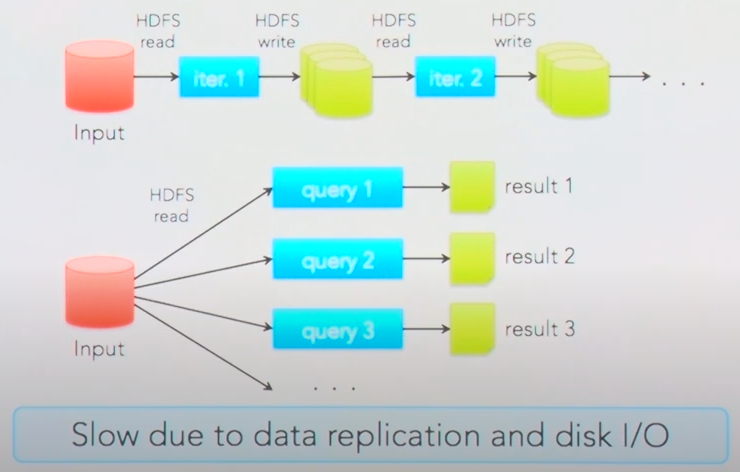
⇒ MapReduce 모델은 하둡(Hadoop)과 같은 시스템에서 널리 사용됨. 데이터를 디스크에 저장하고, 중간 결과도 디스크에 쓰기 때문에 대량의 데이터 처리에 적합하지만, 입출력 작업으로 인해 속도가 느려짐.
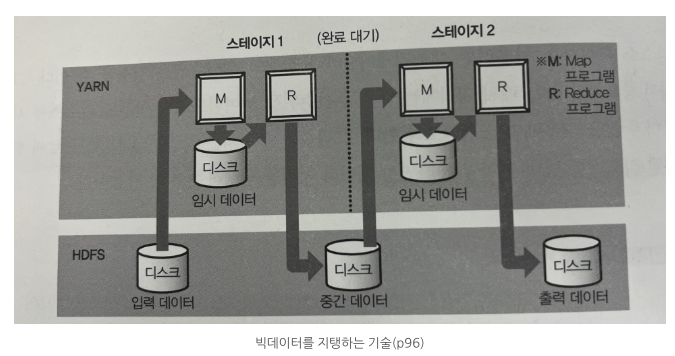
⇒ MapReduce는 YARN (Hadoop에서 사용되는 resource manager - CPU나 메모리 등의 계산 리소스가 관리되며, 아래 그림에서 어떤 호스트에 컨테이너를 어떻게 할당할 것인가를 결정)상에서 동작하는 분산 애플리케이션 중 하나며, 분산 시스템에서 데이터를 처리하는 데 사용됨.

⇒ 또한, SQL 같은 쿼리 언어를 위해 Apache Hive라는 쿼리 엔진을 사용할 수 있는데, 이들은 입력한 쿼리를 자동으로 MapReduce 프로그램으로 변환 해주기에 아래 그림에서 확인할 수 있듯이 위 2개의 애플리케이션 (Hadoop, YARN) 모두 대량의 데이터를 배치 처리에 적합하지만, 애드 훅 쿼리를 여러 번 실행하는 복잡한 쿼리에는 부적합하며데이터 처리의 스테이지가 바꿜 때마다 약간의 대기 시간이 필요 (이건 Hive on Tez같은 기술적인 해결책이 존재)
⇒ 하지만 점점 RAM 가격이 저렴해졌고, (Disk IO로 빠질것을) In-Memory에서 돌아가는 SPARK 등장!
2. Spark (How Spark Work & Spark Session)
How Spark Work

-
Spark는 기본적으로 multi-node (향후 글에서는 이를 CLUSTER 모드/CLUSTER라는 용어로 자주 사용됩니다!)에서 데이터를 처리하는 것을 원칙으로 함
-
따라서 해당 섹션에서는 CLUSTER 모드에서 Spark가 어떻게 동작하는지를 중점적으로 설명하나, 코드 실습은 환경적인 한계로 인해 단일노드 환경에서 진행했음을 양해해주시길 바랍니다
-
Untitled 가 spark-submit이라는 resource를 얼마나 사용할지 config파일 같은 메뉴얼을 user code를 통해 제출하면 Driver Process에서 ‘Untitled ’을 생성
-
이때, 할당받은 Executor에서 실질적인 데이터가 처리됨
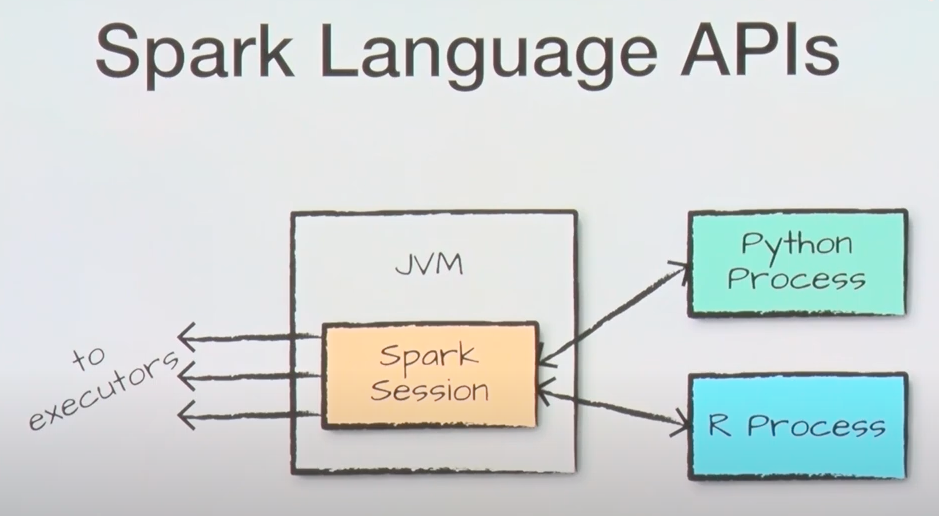
- Spark 자체는 JVM으로 구동이 되지만, 다수의 언어가 Interface 형태로 지원됨!
Spark Context vs. Spark Session
→ 이전에 Spark Session에 대해서 언급을 했는데, Spark Context라는 것도 있다. 둘의 차이를 알아보자
**#### Spark Context **
-
Represents the connection to a Spark cluster (기억하자! Spark는 멀티노드가 디폴트 환경이다)
- Spark 애플리케이션과 Spark 클러스터 간의 연결을 담당. 즉 Spark functionality의 가장 큰 Entry Point!
-
Coordinates task execution across the cluster
-
클러스터 전반에 걸쳐 태스크를 조정하고 실행을 관리
-
데이터를 파티션으로 나누거나, 각 노드에 작업을 분배, 실행 중인 작업의 상태를 모니터링 역할
-
-
Entry point in earlier versions of Spark (1.x)
-
Functionalities
-
Core functionality for low-level programming and cluster interaction
-
Creates RDDs (Resilient Distributed Datasets)
-
RDD는 Spark의 기본 데이터 구조로, 데이터를 클러스터의 여러 노드에 걸쳐 분산시켜 처리할 수 있도록 설계된 불변성 분산 컬렉션.
-
RDD는 데이터의 장애 허용성과 병렬 처리를 지원
-
-
Performs transformations and defines actions
- RDD에 대한 다양한 변환(예:
map,filter,reduceByKey등)을 수행하고, 액션(예:collect,count,saveAsTextFile등)을 정의하여 실제 연산 수행
- RDD에 대한 다양한 변환(예:
-
-
Fully supported for backward compatibility
- SparkContext는 이전 버전과의 완벽한 호환성을 제공. 예를 들어, 기존에 Spark 1.x 버전에서 작성된 애플리케이션이 Spark의 최신 버전에서도 계속 작동할 수 있음
-
Use in specific scenarios or with libraries/APIs reliant on it
- 특정 라이브러리나 API가 여전히 SparkContext를 필요로 하는 경우가 있음 (e.g., 일부 low-level API나 특수한 작업을 수행하는 라이브러리는 SparkContext를 직접 사용)
#### Spark Session
-
Introduced in Spark 2.0
-
Unified entry point for interacting with Spark
- 다양한 기능(SQL 쿼리, DataFrame 작업, 스트리밍 작업 등)을 하나의 인터페이스에서 사용할 수 있게 됨
-
Combines functionalities of SparkContext, SQLContext, HiveContext, and StreamingContext
- SQLContext의 SQL 작업, HiveContext의 Hive 작업, 그리고 StreamingContext의 스트리밍 작업 등을 SparkSession 하나로 처리할 수 있게 되었음 → 사용자의 편의성 증대
-
Supports multiple programming languages (Scala, Java, Python, R)
-
Functionalities
-
Extends SparkContext functionality
- SparkSession은 SparkContext의 모든 기능을 포함하며, 추가적인 기능을 제공
-
Higher-level abstractions like DataFrames and Datasets
-
Provides data source APIs, machine learning algorithms, and streaming capabilities
-
##### Summary
SparkContext를 사용하던 초기 Spark 버전에서는 주로 RDD(Resilient Distributed Datasets)를 사용하여 데이터를 처리. 이후에 조금 더 자세히 설명하겠지만 RDD는 Spark의 가장 기본적인 데이터 구조로, low-level API를 통해 데이터를 다루며, 큰 유연성을 제공하지만, 사용자가 많은 세부 사항을 직접 관리해야 하는 단점이 존재
Spark 2.0 이후 도입된 SparkSession은 DataFrame과 같은 high-level API를 제공함으로써, 사용자가 보다 쉽게 데이터를 구조화하고 SQL과 유사한 쿼리를 사용할 수 있게 해줌. 이 high-level API는 내부적으로 RDD를 사용하지만, 개발자가 직접 RDD를 다루는 것보다 훨씬 간단하고 효율적인 데이터 처리가 가능하도록 설계
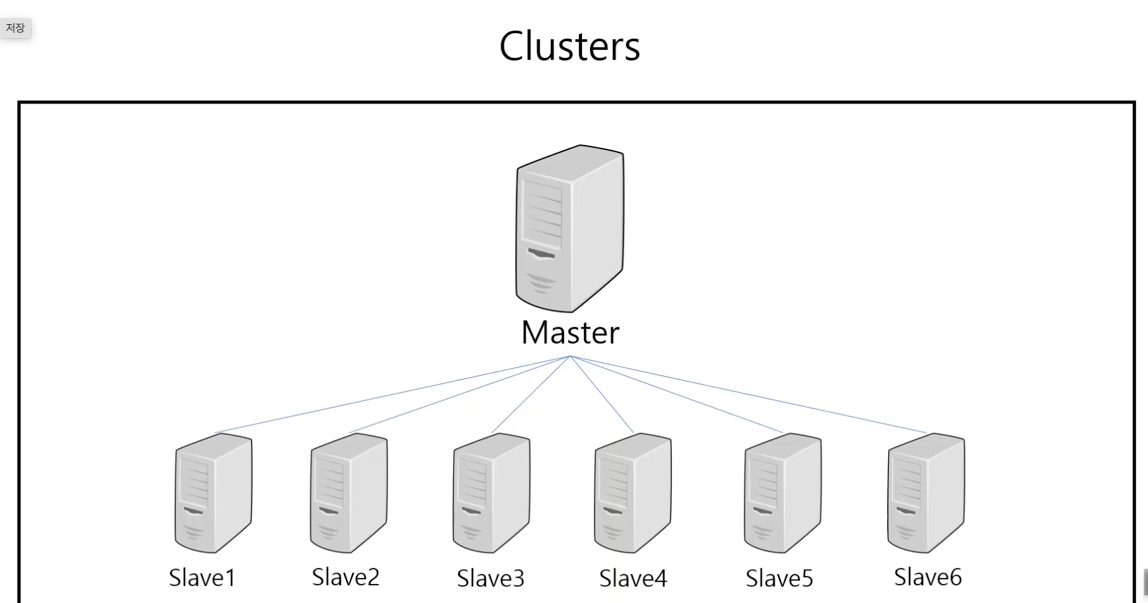
Spark의 Cluster 구성
→ Untitled 에서 어떻게 Spark가 구동되는지 간단히 알아보았으니, Spark가 작동되는 Cluster, 즉 multi-node 환경에서 실제로 앞서 설명한 노드들이 어떤 구조로 이루어져있는지, SparkSession과의 관계성도 고려해서 유기적으로 설명해보겠습니다.
- Master Node와 클러스터 매니저
-
Hadoop HDFS 구조
-
Master 노드 (NameNode):
-
HDFS에서 NameNode은 메타데이터를 관리. 이 메타데이터에는 파일 시스템의 디렉토리 구조, 파일 위치 정보 등이 포함되어 있어, 클러스터의 데이터 노드에서 데이터를 어디에서 찾을 수 있는지를 알려주는 역할을 수행
-
Master 노드는 시스템의 중앙 집중식 관리 노드로서, 전체 파일 시스템의 구조와 상태를 관리
-
-
Slave 노드 (DataNode):
-
실제 데이터 파일은 DataNode에 분산 저장.
-
해당 노드들은 NameNode의 지시에 따라 데이터를 저장하고, 데이터 요청에 응답
-
데이터 노드는 클러스터 내에서 파일 데이터의 실제 저장과 처리를 담당
-
-
Secondary NameNode (위의 그림에는 표기 X):
-
주로 NameNode의 메타데이터를 주기적으로 백업하는 역할을 수행
-
-
클러스터 구조
-
Master 노드:
- Spark에서는 Master 노드가 클러스터 매니저 역할을 수행
-
Worker 노드:
-
Worker 노드는 실제 데이터 처리 작업을 수행하는 노드
-
Master 노드로부터 할당받은 태스크를 수행하며, Spark의 연산과 데이터 저장을 처리
-
-
-
클러스터 매니저(위의 그림의 하단 3개 상자): Spark에서 클러스터 매니저는 클러스터의 리소스(메모리, CPU 등)를 관리
- 클러스터 매니저에는 여러 유형이 있으며(Standalone, YARN, Mesos 등), 이들은 클러스터의 리소스 할당 및 태스크 관리를 담당
⇒ 어?! 로컬/서버 1대에서는 클러스터라는 개념이 성립이 될 수 없는데라는 의문이 들었다면 아래를 계속 읽어주세요!
- Untitled
-
SparkSession은 사용자가 Spark와 상호작용하기 위한 Entry Point. (i.e., 해당 세션을 통해 사용자는 데이터 로드, 처리, 저장 등의 작업을 제출) 하지만, SparkSession은 Local모드. Cluster모드 2가지에서 각각 다르게 동작-
Local 모드 (싱글 머신)
-
SparkSession이.master("local[*]")로 설정된 경우, Master 노드와 Worker 노드 모두 로컬 컴퓨터에서 실행. 이 경우, 단일 컴퓨터에서 모든 Spark 작업이 처리. 클러스터 매니저는 내부적으로 이를 관리하지만, 별도의 물리적 **Master 노드**와 **Worker 노드**는 존재하지 않음 (싱글머신에 컨테이너 N대 띄우고 클러스터모드로 돌리는 환경을 많이 사용하는것 같습니다,,!). -
Local 모드에서 Spark는 싱글 머신에서 실행되며, 사용 가능한 CPU 코어들을 Worker 노드로 간주. 각 코어는 병렬 처리를 수행하는 하나의 “논리적” 워커로 작동
-
Local 모드는 주로 개발과 테스팅을 목적으로 사용되며, 실제 클러스터 환경에서의 실행을 모의하기 위한 방법으로 사용
-
Executor: 로컬 모드에서는 전체 JVM(Spark Session은 JVM으로 돌아감)이 하나의 큰 실행자(executor)로 볼 수 있으며, 여러 스레드가 데이터를 처리
-
-
from pyspark.sql import SparkSession

# Create a SparkSession
# SparkSession builder를 초기화. builder는 SparkSession 객체를 설정하고 생성하는데 사용
# 각 Spark 실행자(executor)가 사용할 수 있는 최대 메모리 양을 2GB로 설정
# reduceByKey나 groupBy 같은 변환 후에 데이터를 어떻게 분할할지를 결정. 이이 값은 셔플 과정에서 생성될 파티션의 수를 의미하며, 각 파티션은 하나의 태스크에 의해 처리
spark = SparkSession.builder \
    .appName("MySparkApplication") \
    .config("spark.executor.memory", "2g") \
    .config("spark.sql.shuffle.partitions", "4") \
    .getOrCreate()
- **CLUSTER 모드 (멀티 머신)**

  - **CLUSTER 모드**에서는 **Master 노드**가 하나의 서버(또는 컴퓨터)에서 실행되고, 여러 워커 노드가 다른 서버에서 실행. 이 경우, **Master 노드**는 클러스터 매니저를 통해 클러스터 전체의 리소스를 관리하고 워커 노드에게 작업을 할당

  - **CLUSTER 모드**에서는 *여러 물리적 머신이 Worker 노드로 구성되어 각기 다른 데이터 세트의 처리를 담당*. 이 각 머신은 독립적인 리소스(CPU, 메모리)를 장착

  - **CLUSTER 모드**에서 Spark는 다수의 Worker Node를 통해 데이터를 분산 처리하며, *각 Worker Node는 하나 이상의 executor를 가질 수 있음*

    - 이 *executor*들이 실제 데이터 처리 작업을 담당하며, 각 *executor*는 Worker 노드의 리소스를 할당받아 독립적으로 작업을 수행

  - 클러스터 매니저(예: YARN, Mesos, Spark 자체의 Standalone 클러스터 매니저)가 전체 자원을 관리하고 워커 노드에 작업을 할당
from pyspark.sql import SparkSession

# Create a SparkSession
# "master_node_address"는 MASTER 노드 서버의 실제 IP 주소나 호스트 이름. 7077은 Spark의 기본 포트
# spark.executor.memory와 spark.executor.cores는 각 실행자가 사용할 메모리와 CPU 코어 수를 설정

# SparkSession 생성
spark = SparkSession.builder \
    .appName("Example on Standalone Cluster") \
    .master("spark://master_node_address:7077") \
    .config("spark.executor.memory", "4g") \
    .config("spark.executor.cores", "2") \
    .getOrCreate()
3. RDDs (Resilient Distributed Datasets)
-
Resilient Distributed Datasets (RDDs)는 Apache Spark의 핵심 데이터 구조로서, 분산 환경에서 대규모 데이터셋의 효율적인 처리를 가능
-
SPARK라는 생태계의 가장 low-level의 데이터 처리 단위라고 필자는 이해하였다.
(하지만 element(요소)단위로 실질적인 transformation이 적용되는거 같음)
About RDDs
- Backbone of data processing in Spark
-
RDD는 Spark에서 데이터 처리 작업의 기본 단위로 사용
-
데이터는 클러스터 전체의 여러 노드에 분산 저장되며, 각 노드는 할당된 데이터 부분에 대한 작업을 병렬로 수행할 수 있음
- Distributed, fault-tolerant, parallelizable data structure, and in-memory
-
분산(Distributed): 데이터는 네트워크상의 여러 컴퓨터(노드)에 걸쳐 분산되어 저장. 이 구조는 데이터를 여러 노드에 나누어 처리함으로써, 처리 속도를 높이고, 한 노드의 실패가 전체 시스템에 미치는 영향을 최소화
-
내결함성(Fault-tolerant): RDD는 데이터의 파티션을 여러 노드에 복제하거나, 데이터의 메타데이터(예: tranformation 연산 기록)를 사용하여 실패한 노드의 데이터를 다시 계산할 수 있게 만듦. 이를 통해 데이터 손실 없이 시스템의 장애를 극복할 수 있음
-
병렬 처리 가능(Parallelizable): 데이터의 각 파티션은 독립적으로 처리될 수 있어, 여러 처리 작업을 동시에 수행
-
메모리 저장(In-Memory): RDD는 데이터를 메모리에 저장하고, 여러 연산을 메모리 상에서 직접 수행함으로써 데이터 접근 시간을 단축
- Efficiently processes large datasets across a cluster
- RDD를 사용하면 매우 큰 데이터셋을 효율적으로 처리. 데이터는 파티션 단위로 분할되고, 각 파티션은 클러스터의 다양한 노드에서 동시에 처리.
- Key characteristics: immutable, distributed, resilient, lazily evaluated, fault-tolerant:
-
불변성(Immutable): 한 번 생성된 RDD는 변경할 수 없음. 데이터에 transformation을 가하려면, 새로운 RDD를 생성하는 transformation 연산을 적용해야 함. 이는 데이터의 일관성을 보장하고, 복잡한 데이터 파이프라인을 안정적으로 관리할 수 있게 함
-
Distributed: 데이터를 여러 노드에 나누어 (partitioned) 분산처리되도록 함
-
Lazily evaluated: RDD 연산은 실제로 액션(action)이 호출될 때까지 실행되지 않음. 불필요한 계산을 피하고 최적화된 방식으로 데이터를 처리
-
**Fault-tolerant: **
map,filter,reduce,collect,count,save등의 연산을 지원하며, 해당 연산들은 모두 내결함성을 갖음. 예를 들어, 하나의 워커 노드가 위의 연산을 처리하는 도중에 문제가 발생해도 해당 노드의 처리가 필요한 RDD 파티션은 다른 노드에서 재처리가 가능함
How to Make RDDs?
**#### **Untitled** **
# Set the PySpark environment variables

import os
os.environ['SPARK_HOME'] = '/Users/name/App/Spark'
#  SPARK_HOME 환경 변수를 설정하여, PySpark가 Spark이 설치된 위치를 알 수 있도록 설정
os.environ['PYSPARK_DRIVER_PYTHON'] = 'jupyter'
# PYSPARK_DRIVER_PYTHON 환경 변수는 PySpark 세션을 시작할 때 어떤 Python 인터페이스를 사용할지 지정
os.environ['PYSPARK_DRIVER_PYTHON_OPTS'] = 'lab'
# PySpark가 Jupyter Lab을 실행할 때 필요한 추가 옵션을 제공
os.environ['PYSPARK_PYTHON'] = 'python'
# PYSPARK_PYTHON 환경 변수는 클러스터의 모든 노드에서 PySpark 작업을 처리할 때 사용할 Python 인터프리터를
# 이 설정은 PySpark가 작업을 분산 처리할 때 일관된 Python 환경을 유지하도록 돕습니다.
from pyspark.sql import SparkSession
# Create a SparkSession
spark = SparkSession.builder.appName("RDD-Demo").getOrCreate()
'''
현재 Spark 세션이 어떤 마스터 설정을 사용하고 있는지를 출력
### LOCAL
- local[*]이면 로컬 모드에서 모든 사용 가능한 코어를 사용하고 있다는 것을 의미
### CLUSTER
spark://host:port 형식이면 특정 클러스터 매니저(Standalone, Mesos, YARN 등)에 연결되어 있다는 것을 의미
'''
spark = SparkSession.builder.appName("RDD-Demo").getOrCreate()
print(spark.sparkContext.master)

# local[*]

'''
로컬 환경에서 실행 중인 경우, 스레드의 수(즉, 병렬 처리 가능한 작업의 수)는 다음과 같이 확인
'''
import multiprocessing

num_cores = multiprocessing.cpu_count()
print("Number of available cores:", num_cores)

# Number of available cores: 10
# Data를 가용할 수 있는 core(CPU 코어들을 Worker 노드)중 5를 활용해 partitioning

numbers = [1, 2, 3, 4, 5]
rdd = spark.sparkContext.parallelize(numbers,5)

num_partitions = rdd.getNumPartitions()
print("Number of partitions:", num_partitions)

# glom() 함수를 사용하면 각 파티션의 데이터를 배열로 변환하여 파티션별로 그룹화
partitioned_data = rdd.glom().collect()

# print
print("Data in each partition:")
for i, data in enumerate(partitioned_data):
    print(f"Partition {i}: {data}")


# Data in each partition:
# Partition 0: [1]
# Partition 1: [2]
# Partition 2: [3]
# Partition 3: [4]
# Partition 4: [5]
rdd.collect()
# [1, 2, 3, 4, 5]
**#### **Untitled** **
from pyspark.sql import SparkSession

# 클러스터 모드에서 Spark 세션 설정
spark = SparkSession.builder \
    .master("spark://master_url:7077") \
    .appName("RDD-Demo") \
    .config("spark.executor.instances", "6") \ # 클러스터 전체에서 워커 노드들에 걸쳐 분배
    .config("spark.executor.memory", "2g") \
    .config("spark.executor.cores", "2") \
    .getOrCreate()


# RDD 생성 및 파티션 설정
numbers = list(range(1, 21))
rdd = spark.sparkContext.parallelize(numbers, 6)  # 명시적으로 파티션 수를 6으로 설정

# 각 파티션의 데이터를 리스트로 변환
partitioned_data = rdd.glom().collect()

# 출력
print("Data in each partition:")
for i, data in enumerate(partitioned_data):
    print(f"Partition {i}: {data}")


'''
(예상 출력 결과)
Data in each partition:
Partition 0: [1, 2, 3, 4]
Partition 1: [5, 6, 7, 8]
Partition 2: [9, 10, 11, 12]
Partition 3: [13, 14, 15, 16]
Partition 4: [17, 18]
Partition 5: [19, 20]
'''
Transformations vs. Actions
-
Transformation과 Action은 RDDs를 조작하고 결과를 도출하는 방법
-
RDD operation은 Spark의 low-level API 작업이기에
SparkSession을 통해 접근 가능한SparkContext의 인스턴스(spark.sparkContext)를 사용.
#### Transformations
-
개념: Transformations은 RDD에 적용되는 연산으로, 새로운 RDD를 생성. Transformations은 ‘지연 평가(lazy evaluation)’ 모델을 따르기 때문에, 실제 연산은 관련된 동작(Action)이 호출될 때까지 실행X
-
특성: Transformations을 통해 생성된 새 RDD는 원본 RDD의 변경 불가능한(immutable) 특성을 유지하며, 원본 데이터를 수정하지 않고 새로운 데이터셋을 생성
-
예시:
map,filter,flatMap,reduceByKey,sortBy,join→filter변환은 조건에 맞는 데이터만을 포함하는 새 RDD를 생성
#### Actions
-
개념: Actions은 RDD에 적용되며, 변환된 데이터에 대해 계산을 실행하고 결과를 반환. Actions은 ‘적극적 평가(eager evaluation)’을 통해 즉시 결과를 도출
-
특성: Actions은 Spark의 연산 과정에서 lazy evaluation된 transformations들을 trigger하고, 최종 결과를 계산하기 위해 데이터를 드라이버 프로그램으로 가져오거나 외부 시스템에 저장
-
예시:
collect,count,first,take,save,foreach→collect동작은 RDD의 모든 요소를 드라이버 프로그램으로 반환하여 사용하도록 함
#### Examples
- Transformation:
#### Big Picture
filtered_customers = customers_rdd.filter(lambda x: x['age'] > 30)
-
즉시 실행 X (i.e., lazy evaluation). 대신, 필요한 계산을 정의하고, 실행 계획을 준비
-
action을 통해서 실행시켜줘야 결과물 확인 가능
### LOCAL 노드 환경 가정

# Create an RDD from a list of tuples
data = [("Alice", 25), ("Bob", 30), ("Charlie", 35), ("Alice", 40)]
rdd = spark.sparkContext.parallelize(data)

# a. Map transformation: Convert name to uppercase
mapped_rdd = rdd.map(lambda x: (x[0].upper(), x[1]))
result = mapped_rdd.collect()
print("rdd with uppercease name: ", result)
#rdd with uppercease name:  [('ALICE', 25), ('BOB', 30), ('CHARLIE', 35), ('ALICE', 40)]

# b. Filter transformation: Filter records where age is greater than 30
filtered_rdd = rdd.filter(lambda x: x[1] > 30)
filtered_rdd.collect()
#[('Charlie', 35), ('Alice', 40)]

# c. ReduceByKey transformation: Calculate the total age for each name
reduced_rdd = rdd.reduceByKey(lambda x, y: x + y)
reduced_rdd.collect()
#[('Alice', 65), ('Bob', 30), ('Charlie', 35)]

# d. SortBy transformation: Sort the RDD by age in descending order
sorted_rdd = rdd.sortBy(lambda x: x[1], ascending=False)
sorted_rdd.collect()
#[('Alice', 40), ('Charlie', 35), ('Bob', 30), ('Alice', 25)]
-
map()-
map()RDD의 각 요소에 주어진 함수를 적용, 그 결과로 새로운 RDD를 생성
-
-
filter()-
filter()주어진 조건 함수를 만족하는 요소들만을 포함하는 새로운 RDD를 생성 -
예시 코드에서는 나이가 30 초과인 사람들만 필터링
-
-
reduceByKey()-
reduceByKey()키-값 쌍(pair)을 가진 RDD에 사용되며, 같은 키를 가진 값들을 주어진 reduce()함수로 합쳐서 새로운 RDD를 생성 -
예시 코드에서는 이름을 키로 하여 나이를 합산
-
-
sortBy()-
sortBy()주어진 키 함수의 결과에 따라 요소를 정렬한 새로운 RDD를 생성 -
예시 코드에서는 나이를 기준으로 내림차순 정렬
-
-
Action:
#### Big Picture
result = filtered_customers.collect()
이제 collect() 동작이 호출되면서, filter 변환에 의해 정의된 모든 ‘_tranformation’ _연산이 실행, 이후 그 결과가 반환
### LOCAL 노드 환경 가정

# Create an RDD from a list of tuples
data = [("Alice", 25), ("Bob", 30), ("Charlie", 35), ("Alice", 40)]
rdd = spark.sparkContext.parallelize(data)

# a. Collect action: Retrieve all elements of the RDD
print("All elements of the rdd: ", rdd.collect())
# All elements of the rdd:  [('Alice', 25), ('Bob', 30), ('Charlie', 35), ('Alice', 40)]

# b. Count action: Count the number of elements in the RDD
count = rdd.count()
print("The total number of elements in rdd: ", count)
# The total number of elements in rdd:  4

# c. First action: Retrieve the first element of the RDD
first_element = rdd.first()
print("The first element of the rdd: ", first_element)
# The first element of the rdd:  ('Alice', 25)

# d. Take action: Retrieve the n elements of the RDD
taken_elements = rdd.take(2)
print("The first two elements of the rdd: ", taken_elements)
#The first two elements of the rdd:  [('Alice', 25), ('Bob', 30)]

# e. Foreach action: Print each element of the RDD
rdd.foreach(lambda x: print(x))
# ('Charlie', 35)
# ('Alice', 25)
# ('Bob', 30)
# ('Alice', 40)
-
collect()-
collect()RDD에 포함된 모든 요소를 드라이버 프로그램(여기서는 사용자의 Local 머신)으로 반환 -
collect()는 RDD 전체를 메모리에 로드하므로, 큰 데이터셋에서는 메모리 오버플로를 발생 가능
-
-
count()-
count()함수는 RDD에 포함된 요소의 총 수를 count해서 반환 -
예시 코드에서는
rdd.count()를 호출하여 데이터의 총 수를 계산하고 그 결과를 출력
-
-
first()-
first()함수는 RDD의 첫 번째 요소를 반환 -
예시 코드에서는
rdd.first()를 사용하여 첫 번째 데이터 요소를 검색하고 그 결과를 출력
-
-
take(n)-
take(n)함수는 RDD에서 처음n개의 요소를 반환 (상위n개 데이터 샘플을 보고자 할 때 사용) -
예시 코드에서는
rdd.take(2)를 호출하여 상위 2개 데이터 요소를 반환
-
-
foreach()-
foreach()함수는 RDD의 각 요소에 대해 지정된 함수를 실행 (RDD의 각 요소에 대해 부작용(side effect)를 가진 작업을 수행할 때 사용 (예: 데이터베이스에 저장, 출력 등)) -
예시 코드에서는
rdd.foreach(lambda x: print(x))를 사용하여 RDD의 모든 요소를 출력
-
Additional Operations
-
saveAsTextFile()-
saveAsTextFile("output.txt")RDD의 내용을 외부 파일 시스템에 텍스트 파일 형식으로 저장 -
로컬 파일 시스템, HDFS(Hadoop Distributed File System), S3 같은 클라우드 스토리지 등 다양한 파일 시스템을 지원
-
output.txt라는 이름으로 저장하면, 실제로는output.txt/part-00000,output.txt/part-00001등의 형태로 여러 파일에 걸쳐 저장 (RDD가 분산되어 처리되기 때문)
-
-
textFile() -
spark.sparkContext.textFile("output.txt")텍스트 파일로부터 새로운 RDD를 생성. 파일의 각 라인을 RDD의 한 요소로 로드
# create rdd from text file
rdd_text = spark.sparkContext.textFile("output.txt")
rdd_text.collect()

# ["('Alice', 25)", "('Bob', 30)", "('Charlie', 35)", "('Alice', 40)"]
4. DataFrame in Spark
DataFrames in Apache Spark
-
Spark DataFrame은 분산 데이터 컬렉션으로, 구조화된 데이터를 테이블 형태로 저장
-
각 컬럼에는 이름과 데이터 타입이 정의되어 있어 SQL 데이터베이스의 테이블과 유사
-
RDD보다 high-level operation 수행가능, 직관적
#### DataFrame Structure
-
각 행은 데이터 레코드(데이터 인스턴스 1개)를 나타내며, 열은 해당 레코드의 특정 필드(속성)를 나타냄
-
사실상 우리가 평소에 접하는 pandas dataframe가 유사, spark에서도 SQL 쿼리를 실행하는 것처럼, DataFrame을 사용하여 데이터에 대한 쿼리, 필터링, 집계 등을 수행 가능
#### Schema Information
-
스키마의 역할: DataFrame의 스키마는 각 컬럼의 이름과 데이터 타입 정보를 포함 (SQL배울때의 그 스키마와 사실상 동일함…)
-
스키마는 데이터를 읽고 쓰는 동안 타입 안정성을 보장하고, SQL 쿼리 및 데이터 처리 작업의 최적화
#### Advantages of DataFrames
-
Optimized Execution
-
Schema Information
- DataFrames의 형태이기에 각 컬럼의 데이터 유형을 미리 알고 있음. 따라서 더 효율적인 데이터 처리와 쿼리 최적화가 가능. 스키마 정보는 query planner에 의해 사용되어 더 빠르고 효율적인 실행 계획을 생성.
-
Predicate Pushdown
- 쿼리의 필터링 조건을 가능한 한 데이터 소스에 가깝게 적용하여 불필요한 데이터의 처리와 이동을 줄이는 최적화도 가능하게 함. 예를 들어, 데이터베이스에서 데이터를 가져올 때 필요한 데이터만 추출하여 전송량을 줄이고 처리 속도를 높임.
-
-
Ease of Use
-
SQL-like Interface (사용편의성)
-
Simplified API
- API 단순화: 복잡한 RDD 변환과 액션 대신, DataFrames API는 직관적이고 선언적인 데이터 조작을 지원 → 사실상 사용자 입장에서 가장 큰 장점 중 하나
-
-
Integration with Ecosystem
-
Seamless Integration
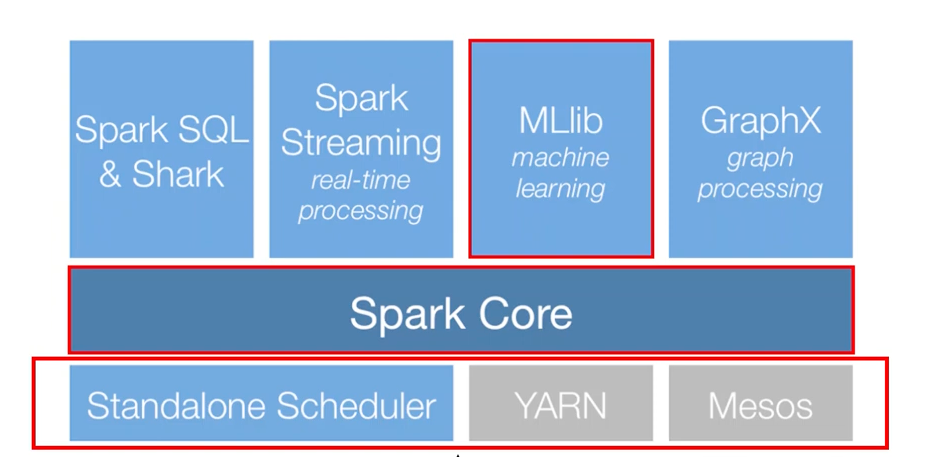
- Spark SQL, MLLib, GraphX 등 Spark의 다른 라이브러리들과의 원활한 통합을 통해, 복잡한 데이터 파이프라인을 구축할 때 일관된 API를 사용 가능 → 마찬가지로 사용자 입장에서 가장 큰 장점 중 하나
-
-
Built-in Optimization
-
Catalyst Optimizer
- Spark의 고급 최적화 엔진인 Catalyst는 실행 계획을 동적으로 컴파일하고 최적화하여 실행 성능을 크게 향상.
-
-
Interoperability
-
Data Format Conversion
- DataFrames는 다양한 데이터 소스와 포맷(Pandas DataFrames, Parquet, JSON 등)으로부터 쉽게 데이터를 읽고 쓸 수 있으며, 다른 데이터 처리 도구와의 연동이 용이 → 전처리하는 입장에서 가장 큰 장점 중 하나
-
Difference from Pandas Dataframes (Mutable vs. Immutable DataFrames)
-
많은 사람들이 처음 데이터를 접할때 배우는 Pandas의 Dataframe과 Spark의 DataFrame은 어떻게 다를까?
-
pandas DataFrame
-
pandas에서의 DataFrame은 mutable(가변)
-
즉, 데이터 프레임 내의 데이터를 직접 변경할 수 있음, 대부분의 사용자가 경험해보았듯이 데이터를 조작하고 업데이트할 때 매우 유연한 구조를 가지고 있음
-
method에
inplace매개변수를 제공하여, 원본 데이터 프레임을 직접 수정할지 여부를 사용자가 선택할 수 있음
-
import pandas as pd

# pandas DataFrame 생성
df_pandas = pd.DataFrame({
    'A': [1, 2, 3],
    'B': [4, 5, 6]
})

# 새 컬럼 추가 (inplace가 필요 없는 연산)
df_pandas['C'] = df_pandas['A'] + df_pandas['B']

# 컬럼 이름 변경 (inplace 옵션 사용)
df_pandas.rename(columns={'A': 'Alpha'}, inplace=True)

# 결과 출력
print(df_pandas)


'''
   Alpha  B  C
0      1  4  5
1      2  5  7
2      3  6  9
'''
-
Spark DataFrame
-
Spark에서의 DataFrame은 immutable(불변)
-
즉, 한 번 생성되면 그 내용을 변경할 수 없으며, 데이터에 변형을 가하고자 할 때는 새로운 DataFrame이 생성
-
from pyspark.sql import SparkSession
from pyspark.sql.functions import col

# SparkSession 시작
spark = SparkSession.builder.appName("example").getOrCreate()

# Spark DataFrame 생성
df_spark = spark.createDataFrame([
    (1, 4),
    (2, 5),
    (3, 6)
], ["A", "B"])

# 새 컬럼 추가
new_df_spark = df_spark.withColumn('C', col('A') + col('B'))

# 컬럼 이름 변경
final_df_spark = new_df_spark.withColumnRenamed('A', 'Alpha')

# 결과 출력
final_df_spark.show()

'''
+-----+---+---+
|Alpha|  B|  C|
+-----+---+---+
|    1|  4|  5|
|    2|  5|  7|
|    3|  6|  9|
+-----+---+---+
'''
Example (RDD vs DataFrame)
- txt file에서 word count를 하고 most frequent word를 찾는 example
# Setting Environment ...

from pyspark.sql import SparkSession
from pyspark.sql.functions import desc

# Create a SparkSession
spark = SparkSession.builder.appName("DataFrame-Demo").getOrCreate()
#### RDD
rdd = spark.sparkContext.textFile("./data/data.txt")
result_rdd = rdd.flatMap(lambda line: line.split(" ")) \
                .map(lambda word: (word, 1)) \
                .reduceByKey(lambda a, b: a + b) \
                .sortBy(lambda x: x[1], ascending=False)
-
**spark.sparkContext.textFile**: 파일 시스템에서 텍스트 파일을 읽어서 RDD를 생성. 각 줄은 RDD의 요소로 변환 (각 line을 index하나로 간주한다고 생각하면 좋을듯…?) -
**flatMap(lambda line: line.split(" "))**: 각 줄을 공백으로 분리하여 단어를 추출 -
**flatMap**은 각 입력 요소에 대해 여러 개의 출력을 생성할 수 있으며, 이 모든 출력을 단일 RDD로 평탄화합니다. -
**map(lambda word: (word, 1))**: 각 단어를(단어, 1)의 tuple 형식으로 매핑 -
**reduceByKey(lambda a, b: a + b)**: 같은 키(단어)를 가진 값들을 합산 → 각 단어의 출현 횟수를 계산 -
**sortBy(lambda x: x[1], ascending=False)**: 계산된 단어의 빈도 수에 따라 내림차순으로 정렬
#### DataFrame
df = spark.read.text("./data/data.txt")
result_df = df.selectExpr("explode(split(value, ' ')) as word") \
              .groupBy("word") \
              .count() \
              .orderBy(desc("count"))
-
**spark.read.text**: 파일 시스템에서 텍스트 파일을 읽어 DataFrame을 생성. 각 line은 DataFrame의 ‘value’라는 이름의 컬럼에 저장 -
**selectExpr("explode(split(value, ' ')) as word")**:selectExpr은 SQL 표현식을 사용해 데이터를 변환 → ‘value’를 공백으로 분리하고,explode함수를 사용해 각 단어를 별도의 row로 확장 -
**groupBy("word")**: ‘word’ 컬럼의 값에 따라 데이터를 그룹화 -
**count()**: 각 그룹의 데이터 수를 세어 ‘count’ 컬럼에 저장 → 각 단어의 출현 횟수를 계산 -
**orderBy(desc("count"))**: ‘count’ 컬럼을 기준으로 내림차순으로 정렬
→ RDD와 마찬가지로 당연히 DataFrame도 Lazy Evaluation의 작동 원리에 따라 Action( ****count**, **collect**, **take** ) 호출하는 순간, Spark는 필요한 데이터만을 계산하여 자원 사용과 처리 시간을 최적화 **
Example (Create Spark DataFrame from CSV)
### Read CSV with header

# Read CSV file into DataFrame
csv_file_path = "./data/products.csv"
df = spark.read.csv(csv_file_path, header=True)

# Display schema of DataFrame
df.printSchema()

# Display content of DataFrame
df.show(5)


'''
root
 |-- id: string (nullable = true)
 |-- name: string (nullable = true)
 |-- category: string (nullable = true)
 |-- quantity: string (nullable = true)
 |-- price: string (nullable = true)

+---+--------------------+---------------+--------+------+
| id|                name|       category|quantity| price|
+---+--------------------+---------------+--------+------+
|  1|           iPhone 12|    Electronics|      10|899.99|
|  2|     Nike Air Max 90|       Clothing|      25|119.99|
|  3|KitchenAid Stand ...|Home Appliances|       5|299.99|
|  4|    The Great Gatsby|          Books|      50| 12.99|
|  5|L'Oreal Paris Mas...|         Beauty|     100|  9.99|
+---+--------------------+---------------+--------+------+
'''
- Spark로 csv file을 불러올 수 있으나 schema를 제대로 읽지 못하는 것을 확인할 수 있음
### Read CSV with an explicit schema definition

# import necessary types
from pyspark.sql.types import StructType, StructField, StringType, IntegerType, DoubleType
# Define the schema
schema = StructType([
    StructField(name="id", dataType=IntegerType(), nullable=True),
    StructField(name="name", dataType=StringType(), nullable=True),
    StructField(name="category", dataType=StringType(), nullable=True),
    StructField(name="quantity", dataType=IntegerType(), nullable=True),
    StructField(name="price", dataType=DoubleType(), nullable=True)
])
# Read CSV file into DataFrame with schema definition
csv_file_path = "./data/products.csv"
df = spark.read.csv(csv_file_path, header=True, schema=schema)
# Display schema of DataFrame
df.printSchema()

# Display content of DataFrame
df.show(5)

'''
root
 |-- id: integer (nullable = true)
 |-- name: string (nullable = true)
 |-- category: string (nullable = true)
 |-- quantity: integer (nullable = true)
 |-- price: double (nullable = true)

+---+--------------------+---------------+--------+------+
| id|                name|       category|quantity| price|
+---+--------------------+---------------+--------+------+
|  1|           iPhone 12|    Electronics|      10|899.99|
|  2|     Nike Air Max 90|       Clothing|      25|119.99|
|  3|KitchenAid Stand ...|Home Appliances|       5|299.99|
|  4|    The Great Gatsby|          Books|      50| 12.99|
|  5|L'Oreal Paris Mas...|         Beauty|     100|  9.99|
+---+--------------------+---------------+--------+------+
only showing top 5 rows
'''
- 명시적 schema를 제공함으로써 제대로된 데이터타입을 가질 수 있도록 할 수 있음
### Read CSV file into DataFrame with inferSchema
csv_file_path = "./data/products.csv"
df = spark.read.csv(csv_file_path, header=True, inferSchema=True)
# Display schema of DataFrame
df.printSchema()

# Display content of DataFrame
df.show(5)

'''
root
 |-- id: integer (nullable = true)
 |-- name: string (nullable = true)
 |-- category: string (nullable = true)
 |-- quantity: integer (nullable = true)
 |-- price: double (nullable = true)

+---+--------------------+---------------+--------+------+
| id|                name|       category|quantity| price|
+---+--------------------+---------------+--------+------+
|  1|           iPhone 12|    Electronics|      10|899.99|
|  2|     Nike Air Max 90|       Clothing|      25|119.99|
|  3|KitchenAid Stand ...|Home Appliances|       5|299.99|
|  4|    The Great Gatsby|          Books|      50| 12.99|
|  5|L'Oreal Paris Mas...|         Beauty|     100|  9.99|
+---+--------------------+---------------+--------+------+
only showing top 5 rows
'''
- inferSchema=True를 추가해서 spark가 자동으로 datatype을 추적하도록 할 수 있음.
Transformations & Actions
from pyspark.sql import SparkSession

# Create a SparkSession
spark = SparkSession.builder.appName("DataFrame-Operations").getOrCreate()

# Load the synthetic data into a DataFrame
data_file_path = "./data/stocks.txt"
df = spark.read.csv(data_file_path, header=True, inferSchema=True)

# Select specific columns
selected_columns = df.select("id", "name", "price")
print("Selected Columns:")
selected_columns.show(10)

'''
Selected Columns:
+---+----------------+-------+
| id|            name|  price|
+---+----------------+-------+
|  1|          iPhone| 899.99|
|  2|         Macbook|1299.99|
|  3|            iPad| 499.99|
|  4|      Samsung TV| 799.99|
|  5|           LG TV| 699.99|
|  6|      Nike Shoes|  99.99|
|  7|    Adidas Shoes|  89.99|
|  8| Sony Headphones| 149.99|
|  9|Beats Headphones| 199.99|
| 10|    Dining Table| 249.99|
+---+----------------+-------+
only showing top 10 rows
'''
-
**select**: 표현식 집합을 선택하고 새로운 DataFrame을 반환
# Filter rows based on a condition
filtered_data = df.filter(df.quantity > 20)
print("Filtered Data:", filtered_data.count())
filtered_data.show()

'''
Filtered Data: 12
+---+--------------+-----------+--------+-----+
| id|          name|   category|quantity|price|
+---+--------------+-----------+--------+-----+
|  6|    Nike Shoes|   Clothing|      30|99.99|
|  7|  Adidas Shoes|   Clothing|      25|89.99|
| 12|        Apples|       Food|     100|  0.5|
| 13|       Bananas|       Food|     150| 0.25|
| 14|       Oranges|       Food|     120| 0.75|
| 15|Chicken Breast|       Food|      50| 3.99|
| 16| Salmon Fillet|       Food|      30| 5.99|
| 24|    Laptop Bag|Accessories|      25|29.99|
| 25|      Backpack|Accessories|      30|24.99|
| 28|         Jeans|   Clothing|      30|59.99|
| 29|       T-shirt|   Clothing|      50|14.99|
| 30|      Sneakers|   Clothing|      40|79.99|
+---+--------------+-----------+--------+-----+
'''
-
**filter**: 주어진 조건을 만족하는 행만 필터링
# GroupBy and Aggregations
grouped_data = df.groupBy("category").agg({"quantity": "sum", "price": "avg"})
print("Grouped and Aggregated Data:")
grouped_data.show()

'''
Grouped and Aggregated Data:
+-----------+-------------+------------------+
|   category|sum(quantity)|        avg(price)|
+-----------+-------------+------------------+
|       Food|          450|2.2960000000000003|
|     Sports|           35|             34.99|
|Electronics|           98| 586.6566666666665|
|   Clothing|          200|  99.2757142857143|
|  Furniture|           41|            141.99|
|Accessories|           55|             27.49|
+-----------+-------------+------------------+
'''
-
**groupBy**: 지정된 열을 기준으로 DataFrame을 그룹화 -
**agg**: 그룹화된 데이터에 대해 집계 함수(sum, avg)를 수행
… 이외에도 **join**** , ****orderBy**** **등의 transformation 적용 가능
5. Code Review - Deduplication Data with PySpark (NLP)
- LLM Training을 위해서는 대용량 Corpus 수집 후 전처리가 필수적
(실제로 NLP Researcher들이 Spark를 가장 많이 활용할 부분)
-
polyglot 모델 학습시에 Deduplication, 전처리코드 활용되었던 https://github.com/EleutherAI/dps 레포지토리내의 Deduplication 코드를 상세하게 리뷰해보면서 PySpark가 어떻게 사용되는지 이해를 높혀보고자 한다!
-
아래는 dps/spark/jobs/dedup_job.py 전문
"""
Run this from project root path

python bin/sparkapp.py dedup_job --config_path=./configs/dedup_job.yaml
"""

import random
from itertools import combinations

import yaml
from pyspark import SparkContext
from pyspark.rdd import RDD

from dps.spark.spark_session import spark_session
from dps.spark.utils.io_utils import read_line, to_json
from dps.spark.prep.dedup_prep import (
    shingle_word,
    generate_minhash,
    jaccard_by_hashvalues,
)


def expand_instances_by_minhash(
    data, expand_size: int, n_gram: int, seed: int = 1, char_level: bool = False
):
    shingles = shingle_word(data["text"], n_gram=n_gram, char_level=char_level)
    minhashes = generate_minhash(shingles, num_perm=expand_size, seed=seed)

    for mh in minhashes.tolist():
        yield (str(mh), [dict(**data, shingles=shingles, hashvalues=minhashes)])


def explore_dedup_instance(hash_groups, threshold: float = 0.8):
    if len(hash_groups) <= 1:
        return

    group_represent_text = hash_groups[0][
        "text"
    ]  # not to remove all text instances in group.
    pairs = combinations(hash_groups, 2)

    for d_1, d_2 in pairs:
        sim_score = jaccard_by_hashvalues(d_1["hashvalues"], d_2["hashvalues"])
        if sim_score >= threshold:
            dedup_text = [d_1["text"], d_2["text"]]
            if group_represent_text in dedup_text:
                yield dedup_text[0] if dedup_text[
                    0
                ] != group_represent_text else dedup_text[1]
            else:
                yield random.choice(dedup_text)


def dedup_job(config_path):
    with open(config_path) as f:
        conf = yaml.load(f, Loader=yaml.FullLoader)

    input_paths = ",".join([f'{conf["base_dir"]}/{t}' for t in conf["targets"]])

    with spark_session(f"") as spark:
        sc: SparkContext = spark.sparkContext

        proc_rdd: RDD = (
            sc.textFile(input_paths)
            .repartition(conf["n_dist"])
            .flatMap(read_line)
            .cache()
        )

        overlap_kv_rdd: RDD = (
            proc_rdd.flatMap(
                lambda x: expand_instances_by_minhash(
                    x,
                    expand_size=conf["num_expand"],
                    n_gram=conf["n_gram"],
                    seed=conf["seed"],
                    char_level=conf["char_level"],
                )
            )
            .reduceByKey(lambda x, y: x + y)
            .flatMap(
                lambda x: explore_dedup_instance(x[1], threshold=conf["sim_threshold"])
            )
            .distinct()
            .map(lambda x: (x, dict(text=x)))
            .cache()
        )

        proc_rdd.map(lambda x: (x["text"], x)).subtractByKey(overlap_kv_rdd).map(
            lambda x: x[1]
        ).repartition(conf["n_output"]).flatMap(to_json).saveAsTextFile(
            conf["output_dir"]
        )
#### Function
def expand_instances_by_minhash(
    data, expand_size: int, n_gram: int, seed: int = 1, char_level: bool = False
):
    shingles = shingle_word(data["text"], n_gram=n_gram, char_level=char_level)
    minhashes = generate_minhash(shingles, num_perm=expand_size, seed=seed)

    for mh in minhashes.tolist():
        yield (str(mh), [dict(**data, shingles=shingles, hashvalues=minhashes)])
-
shingle_word: data를 n-gram 또는 문자 단위로 분할 -
generate_minhash: 분할된 data로부터 MinHash 값을 생성- 실제로 저 함수는 hash_values = np.array([])라는 것을 반환
-
expand_instances_by_minhash: 를 거치면 각 데이터는 하나의 min_hash value로 mapping됨 (yield (str(mh), [dict(**data, shingles=shingles, hashvalues=minhashes)]))
⇒ Example
-
text: “안녕하세요 여러분 안녕하세요”
-
n_gram: 2,
-
shingle_word: [“안녕하세요_여러분”, “여러분_안녕하세요”] -
minhases: [11,23, … ]
def explore_dedup_instance(hash_groups, threshold: float = 0.8):
    if len(hash_groups) <= 1:
        return

    group_represent_text = hash_groups[0]["text"]
    pairs = combinations(hash_groups, 2)

    for d_1, d_2 in pairs:
        sim_score = jaccard_by_hashvalues(d_1["hashvalues"], d_2["hashvalues"])
        if sim_score >= threshold:
            dedup_text = [d_1["text"], d_2["text"]]
            if group_represent_text in dedup_text:
                yield dedup_text[0] if dedup_text[0] != group_represent_text else dedup_text[1]
            else:
                yield random.choice(dedup_text)
-
combinations: 가능한 모든 텍스트 쌍을 생성- 이때 Untitled 에서 생성한 str(mh)끼리만 combinations를 생성 (그룹 내의 모든 데이터 쌍의 조합을 생성)
-
jaccard_by_hashvalues: 위에서 생성한 combinations 텍스트 사이의 유사도를 계산 -
theshold가 높을 경우 두 instance 중 하나만 반환
#### Spark
proc_rdd: RDD = (
    sc.textFile(input_paths)
    .repartition(conf["n_dist"])
    .flatMap(read_line)
    .cache()
)
-
sc.textFile: 지정된 경로에서 텍스트 파일을 읽어 RDD를 생성 -
repartition:n_dist설정에 따라 RDD의 파티션 수를 조정하여 데이터 분포를 최적화 -
flatMap:read_line함수를 각 입력 라인에 적용하여 각 줄의 데이터를 단일 요소로 읽음 -
cache: RDD를 메모리에 캐시하여 다중 작업에서 성능을 향상
overlap_kv_rdd: RDD = (
    proc_rdd.flatMap(
        lambda x: expand_instances_by_minhash(
            x,
            expand_size=conf["num_expand"],
            n_gram=conf["n_gram"],
            seed=conf["seed"],
            char_level=conf["char_level"],
        )
    )
    .reduceByKey(lambda x, y: x + y)
    .flatMap(
        lambda x: explore_dedup_instance(x[1], threshold=conf["sim_threshold"])
    )
    .distinct()
    .map(lambda x: (x, dict(text=x)))
    .cache()
)
-
expand_instances_by_minhash: 각 데이터 인스턴스에 대해 Untitled 적용 -
reduceByKey: 동일한 키를 가진 데이터를 합침 → 데이터를 그룹화가 일어나기 때문에 str(mh)별로 묶임 -
explore_dedup_instance: 설정된 유사도 임계값을 기반으로 중복을 식별하고 제거 -
distinct: 중복된 결과를 제거 -
map: 각 결과에 대한 추가적인 데이터 구조를 생성
(예시: [(“apple”, {‘text’: ‘apple’}), (“banana”, {‘text’: ‘banana’}), (“cherry”, {‘text’: ‘cherry’})])
⇒ 위 코드는 중복된 instance/RDD를 찾아내는 함수
proc_rdd.map(lambda x: (x["text"], x)).subtractByKey(overlap_kv_rdd).map(
    lambda x: x[1]
).repartition(conf["n_output"]).flatMap(to_json).saveAsTextFile(
    conf["output_dir"]
)
-
subtractByKey: 중복된 데이터를 제거, 즉overlap_kv_rdd에 있는 키를 가진 데이터는 제거 -
repartition: 결과 데이터의 파티션 수를 조절 -
flatMap(to_json): 결과 데이터를 JSON 형식으로 변환 -
saveAsTextFile: 최종 결과를 텍스트 파일로 저장
6. References
https://spark.apache.org/docs/3.2.1/api/java/overview-summary.html
https://www.youtube.com/playlist?list=PLwFJcsJ61ouiU1wvzzRk3pjU8xT9buJhr
https://www.youtube.com/watch?v=D3TLh_QVGPg&t=11s
https://www.youtube.com/watch?v=rjJ54qtOjW4&list=PL9mhQYIlKEhf23_3QIqQvsa_06CyTZGdl
https://blog.naver.com/rlxk751/223242151249
https://blog.naver.com/rlxk751/223286523772
https://github.com/coder2j/pyspark-tutorial/tree/main